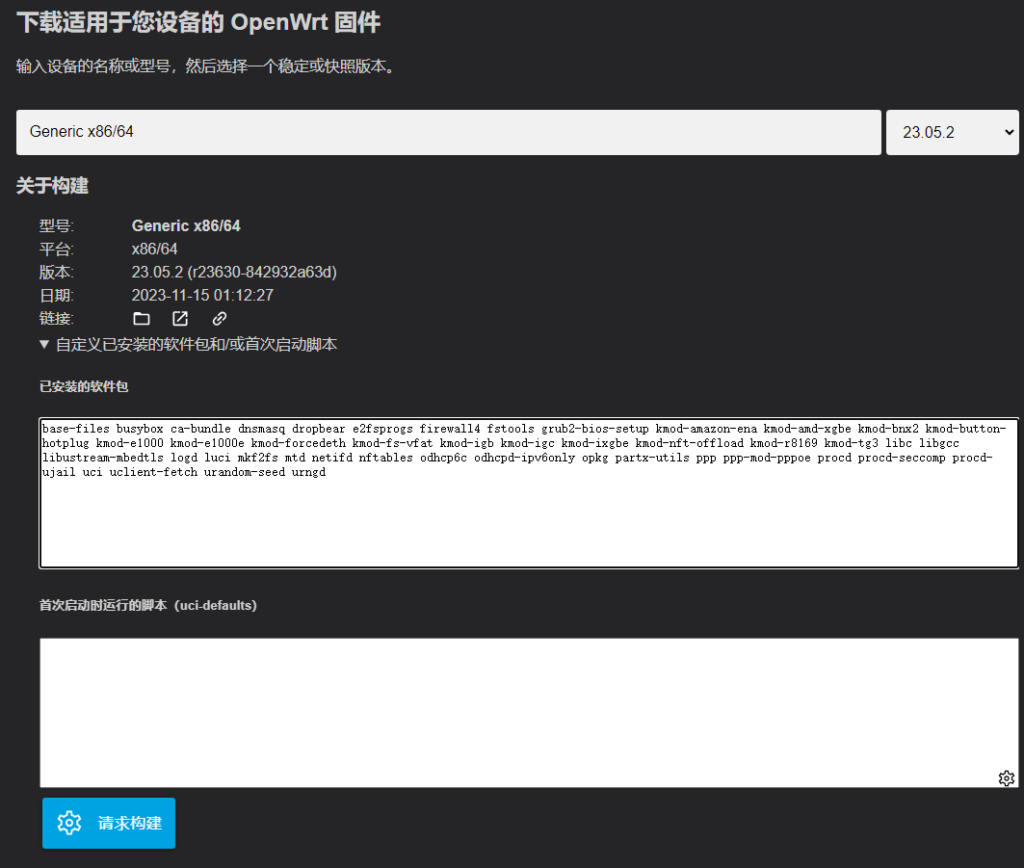
openwrt 官方有了自定义构建,这样可以预先内置 / 修改一些自己需要软件包而不需要安装完成后再去处理了,省时方便~
首先打开 openwrt 官网固件下载页 https://firmware-selector.openwrt.org/
然后输入设备,选择自己需要的固件,展开 自定义已安装的软件包和/或首次启动脚本 项,就可以对固件进行自定义了:

已安装的软件包:这里默认是官方固件里面自带的,可以酌情进行增删!
dnsmasq替换为dnsmasq-full- 加入中文语言包:
luci-i18n-base-zh-cnluci-i18n-firewall-zh-cnluci-i18n-opkg-zh-cn - 加入 WireGuard:
luci-proto-wireguard
首次启动时运行的脚本(uci-defaults):这里可以调整一些配置,比如默认 IP 等,官方还给了一个示例:
# Beware! This script will be in /rom/etc/uci-defaults/ as part of the image.
# Uncomment lines to apply:
#
# wlan_name="OpenWrt"
# wlan_password="12345678"
#
# root_password=""
# lan_ip_address="192.168.1.1"
#
# pppoe_username=""
# pppoe_password=""

# log potential errors
exec >/tmp/setup.log 2>&1

if [ -n "$root_password" ]; then
  (echo "$root_password"; sleep 1; echo "$root_password") | passwd > /dev/null
fi

# Configure LAN
# More options: https://openwrt.org/docs/guide-user/base-system/basic-networking
if [ -n "$lan_ip_address" ]; then
  uci set network.lan.ipaddr="$lan_ip_address"
  uci commit network
fi

# Configure WLAN
# More options: https://openwrt.org/docs/guide-user/network/wifi/basic#wi-fi_interfaces
if [ -n "$wlan_name" -a -n "$wlan_password" -a ${#wlan_password} -ge 8 ]; then
  uci set wireless.@wifi-device[0].disabled='0'
  uci set wireless.@wifi-iface[0].disabled='0'
  uci set wireless.@wifi-iface[0].encryption='psk2'
  uci set wireless.@wifi-iface[0].ssid="$wlan_name"
  uci set wireless.@wifi-iface[0].key="$wlan_password"
  uci commit wireless
fi

# Configure PPPoE
# More options: https://openwrt.org/docs/guide-user/network/wan/wan_interface_protocols#protocol_pppoe_ppp_over_ethernet
if [ -n "$pppoe_username" -a "$pppoe_password" ]; then
  uci set network.wan.proto=pppoe
  uci set network.wan.username="$pppoe_username"
  uci set network.wan.password="$pppoe_password"
  uci commit network
fi

echo "All done!"
这里再补充一些设置:
# 设置时区
uci set system.@system[0].zonename='Asia/Shanghai'
uci set system.@system[0].timezone='CST-8'

uci commit

# 设置软件源(清华源)
sed -i 's/downloads.openwrt.org/mirrors.tuna.tsinghua.edu.cn\/openwrt/g' /etc/opkg/distfeeds.conf
最后点击请求构建,等待官方镜像构建完毕,即可在下面下载到啦~

Comments NOTHING